Service platform
The service platform is the administrator's daily workspace. Use its browser interface to create sites and spaces, maintain person records, arrange relationships, and check terminal connections. The delivered pages currently use campus, building, room and student fields as their main example. The central service stores data, receives device events, and processes person synchronization; the browser application provides the management interface.
Before you begin
Have the access address and account provided by your administrator ready, and confirm that you are working in the correct site. For an initial setup, use one test space and one test person to verify enrollment, synchronization, and recognition before starting routine enrollment.
| Task | Where to go |
|---|---|
| Review beds, occupancy, and building summaries | Dashboard |
| Create campuses, districts, buildings, and rooms | Apartment → Room Management |
| Assign or move residents and review their photos | Apartment → Resident Management |
| Query residents who have not returned by a cutoff time | Apartment → Absence Statistics |
| Maintain colleges, majors, and classes | Colleges & Majors |
| Create, search, and edit student profiles | Student Info |
| Maintain academic years and term dates | Term Management |
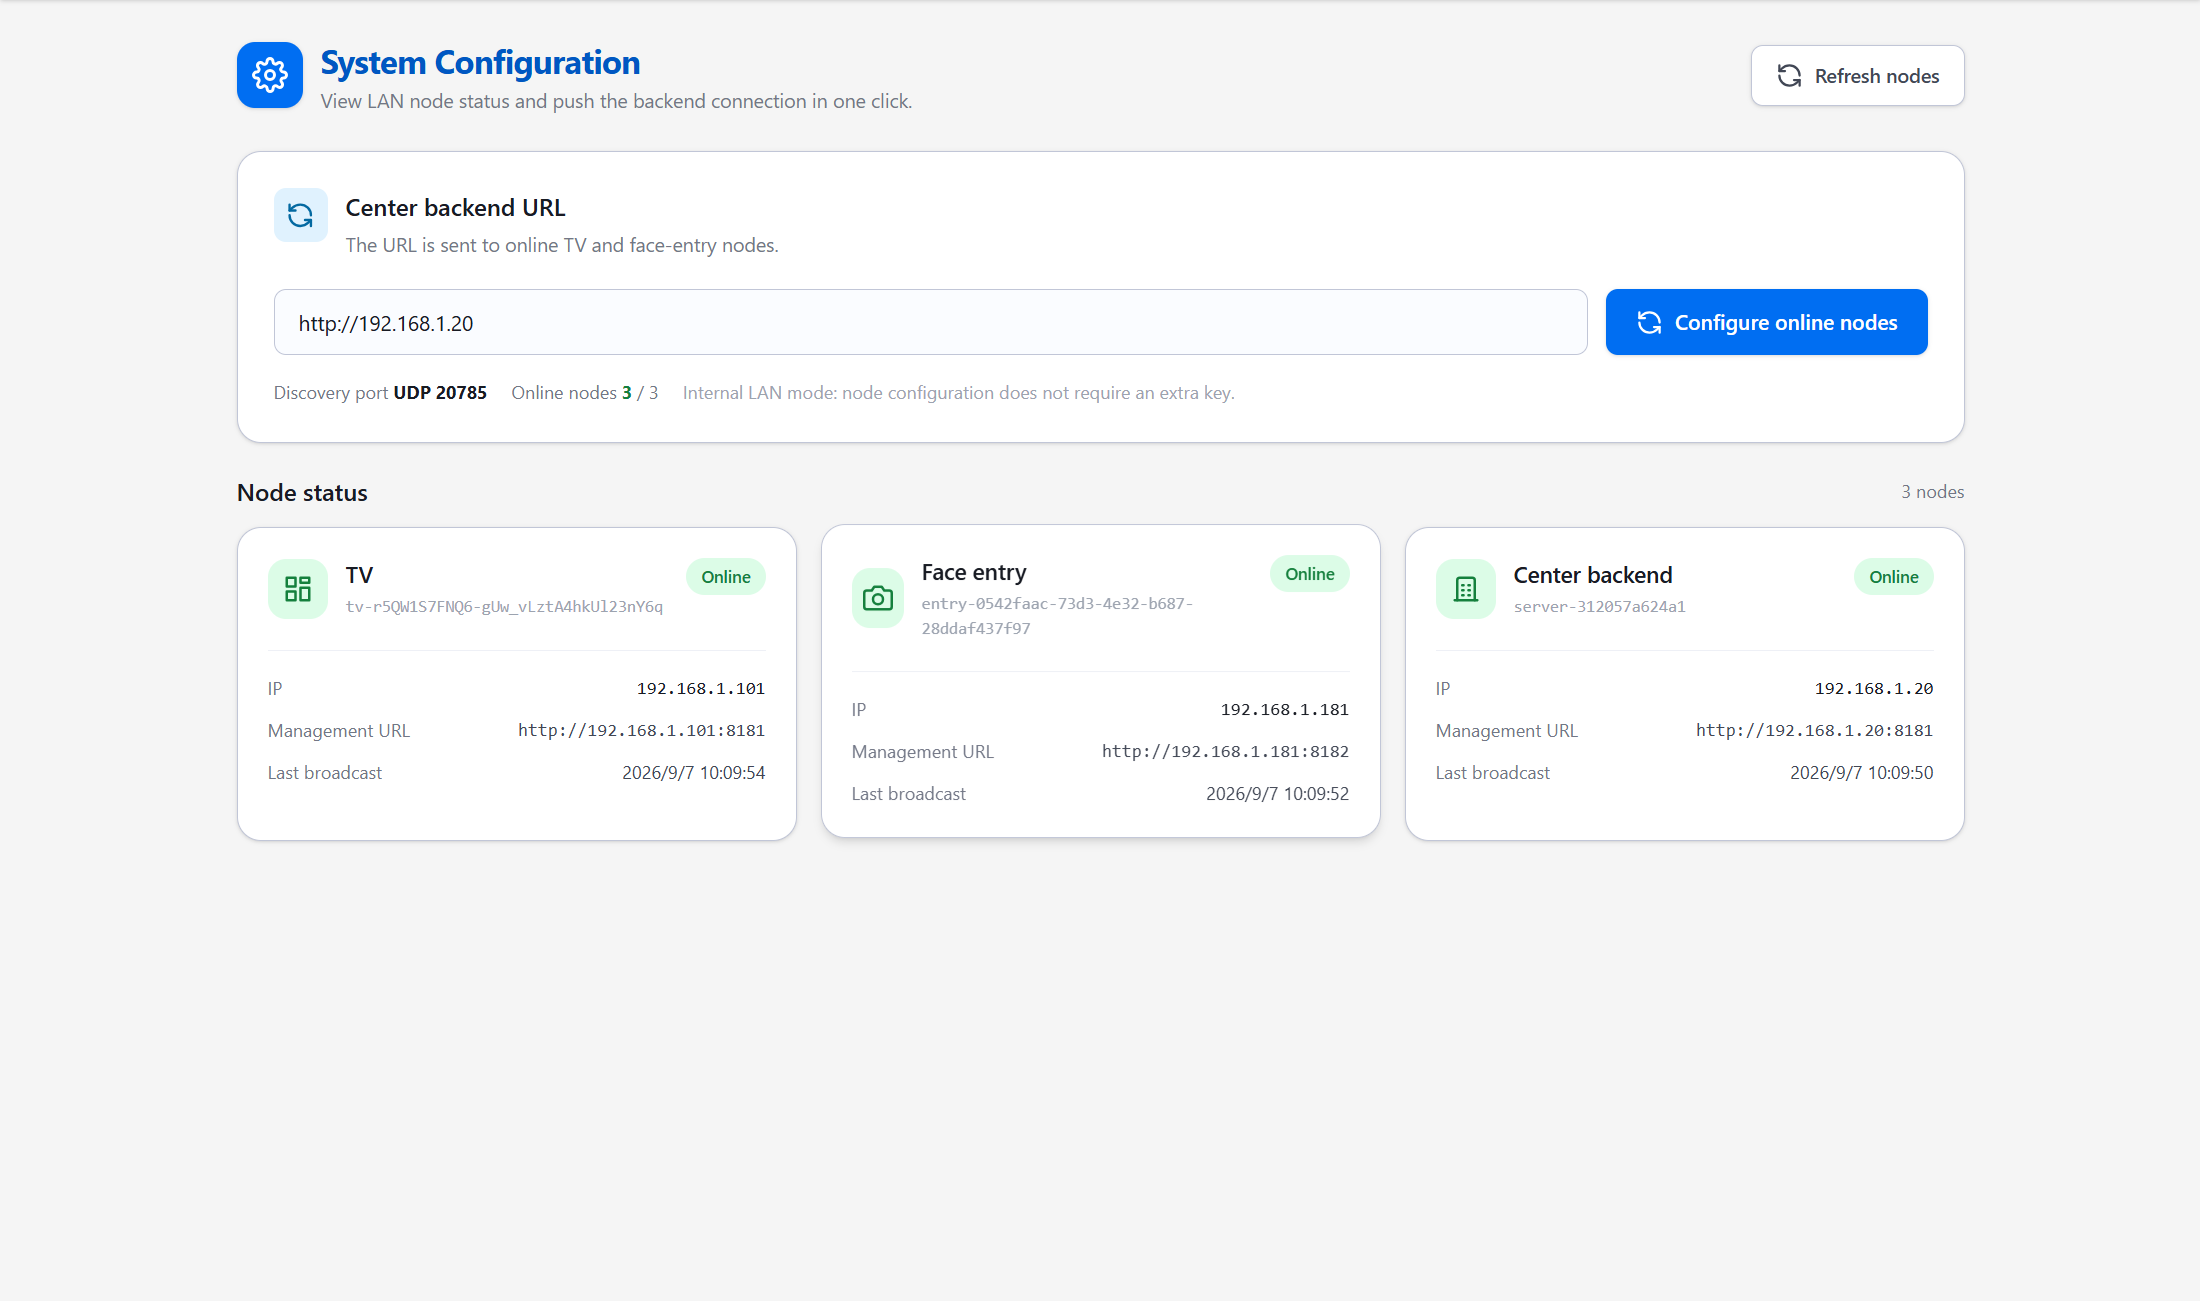
| Discover terminals and configure their central address | System Configuration |
Set up accommodation
Prerequisite: Prepare the campus, building, floor, and room list.
- Open Room Management. Create the hierarchy in the left tree: campus → district → building.
- Enter the building name, number of floors, and building type. The floor count should match the site and enrollment terminal configuration.
- Maintain room-type templates, including bed counts and types. Then create rooms with their room number, floor, type, and applicable restrictions.
- Select the building and review its rooms in the floor overview, card, or list view. Filter by room number, floor, or room type as needed.
Check the result: Each room appears under the correct building and floor, and its total bed count matches the plan. Occupancy statistics depend on this information; correct missing rooms before interpreting the totals.
Before deleting a space or room type, review its child rooms and resident relationships. Use editing for a name change rather than deleting and recreating the record.
Create student profiles
- In Colleges & Majors, create a college, then its majors and classes. A college must be selected before adding a major, and a major before adding a class.
- Open Student Info and search by name or student number to avoid duplicates.
- Create the student with a student number and name. Check gender, and optionally provide phone number, ethnicity, alias, and class assignment.
- Save, search for the student again, and verify the stored details.
The student number cannot be changed in the edit form. The current edit action saves name, gender, phone number, ethnicity, and alias. Ask the administrator to handle class changes for existing students: the class selector in the edit dialog does not establish that a class change was saved.
To capture or update a face photo, continue with the enrollment terminal. Use the agreed school identifier consistently so that the same person is not enrolled under different records.
Assign, move, or unassign residents
Prerequisite: The target building and room exist, and the person already has a record.
- Open Apartment → Resident Management and select the relevant building.
- Search by name, student number, or room number. Check the person's photo and current room.
- Assign an unassigned person to the target room, move an existing resident to another room, or remove a person from their room to make them unassigned.
- After saving, recheck the person's room and the resident counts and available beds in both affected rooms.
If the person needs recognition access at an entrance, also check synchronization to the relevant device. Follow enrollment and synchronization for the full verification sequence.
Review occupancy and residents who have not returned
The dashboard summarizes beds, residents, available beds, occupancy rate, and current in-room counts, with building-level accommodation information. When a count looks wrong, check resident-to-room relationships before investigating entry and exit events.
To query residents who have not returned:
- Open Apartment → Absence Statistics and select a specific building.
- Set the cutoff time and run the query.
- Filter by name or student number, then review the person, status, and cutoff time.
- Export the current filtered results as CSV when needed for handover. Confirm the building and time before comparing reports.
Results depend on the entry and exit records received by the system. Offline devices, missing events, incorrect times, or room assignments can affect the result. Verify the situation on site before acting on it.
Maintain terms
In Term Management, create or edit the term name, academic year, start date, end date, and week-start date. Check the saved dates; the active term is determined from the date range.
The natural-week rules, term-switch reminders, and related settings area are not currently saved as a complete feature. Do not rely on them as active reminder features.
Connect enrollment and display terminals
- Start the terminal applications and confirm that the network allows discovery between the central service, enrollment terminals, and display terminals.
- Open System Configuration to check each node's type, identifier, address, last announcement, and status. The list refreshes every 15 seconds and can also be refreshed manually.
- Enter the central service base address that the terminals can actually reach, including the protocol and any required port. Do not use the administrator computer's loopback address.
- Run the action to configure online nodes and review each success or failure result.
- Check each terminal: the enrollment terminal should retrieve the correct rooms, and the display should show a healthy central connection. Then verify a real operation.
Node discovery locates system applications. Recognition-device heartbeats describe external device status. Their counts and meanings differ, and a successful configuration does not mean person synchronization has finished.
Settings and sign-out
The settings entry in the top bar provides Chinese / English selection and current account and version information. On shared computers, sign out when finished. If a session expires, log in again; persistent failures are covered under login troubleshooting.